Monday, 17 October 2011

Flow Activity Concept in BPEL process

Flow Activity is only useful in case of Asynchronous call.
A BPEL process service component must sometimes gather information from multiple asynchronous sources. Because each callback can take an undefined amount of time (hours or days), it may take too long to call each service one at a time. By breaking the calls into a parallel flow, a BPEL process service component can invoke multiple web services at the same time, and receive the responses as they come in. This method is much more time efficient.
In case of Synchronous Call:- Oracle BPEL Process Manager executes in a single thread, executing the branches sequentially instead of in parallel
Create two synchronous BPEL process suppose one is to do Addition of two numbers and second one is to do multiplication of two numbers and one asynchronous process to do the concatenation.Now Invoke these webservices in one BPEL process using Flow Activity and test it in the Enterprise manager and see the Flow trace model.In my case it executed multiplication then after excuted Addition then it will execute concatenation Asynchronous process.
We need to set nonBlokingInvoke property set to true in partner link properties panel.
To perform this operation right click on the partner link and select the edit,then go to proprties tab and click the add icon then select this property from the provided values in drop down.

If this property is set then asynchronous partner link will not be blocked by synchronous partner links.
If we will not set this property then all synchronous process will execute first then asynchronous process will be executed.
Hope this would help.


How to create User Defined Custom XPATH function to use in XSLT

In this post we will see that how to create user defined function to use in XSLT Mapper.

Step1:- Create Java class to write the User defined function. The below Java code will convert long value into decimal value.

package com.geo.xpath;

public class LongToNumericPrimitiveTypesExample {

public static double LongToNumericPrimitiveTypes (Long input){
Long lObj = new Long("input");
double d = lObj.doubleValue();
return d;

}

}

Step 2:- Create ext-mapper-xpath-functions-config.xml file to contain the following value

<soa-xpath-functions version="11.1.1"

xmlns="http://xmlns.oracle.com/soa/config/xpath"

xmlns:geo="http://www.oracle.com/XSL/Transform/java/com.geo.xpath.LongToNumericPrimitiveTypesExample">

<function name="geo:LongToNumericPrimitiveTypes">

<className>com.geo.xpath.LongToNumericPrimitiveTypesExample</className>

<return type="number"/>

<params>

<param name="input" type="number"/>

</params>

<desc/>

<detail>

<![CDATA[This function convert long to decimal message.]]>

</detail>

</function>
</soa-xpath-functions>

In this XML basically Java class method is defined. Put this XML inside the META-INF folder in the same java class and create a JAR file of it.

Step 3:- For creating JAR file from JDeveloper. Right Click on the Java project select New -> Deployment Profile(From option select JAR File) then name the jar file and click next. Accept the all default value and the click Finish. Now right click again on the same project and click on the deploy option and deploy that JAR Archive. It will create the JAR file on to location like JDeveloper\mywork\Application1\LongTodecimalConversion\deploy. Verify if in the created jar file META-INF folder contains the ext-mapper-xpath-functions-config.xml file.

Step 4:- Now in JDeveloper select the Tools -> Preferences -> SOA and use the Add button to select the created jar. Now restart the JDeveloper. Created function will be available in user defined section of XSLT Mapper.


Now this is available at design time. Test it using the test  functionality of XSLT Mapper.

Step 5:- Now to make it available at run time put ext-mapper-xpath-functions-config.xml on the location <<SOAOracle_HOME>>\Oracle_SOA1\soa\modules\oracle.soa.ext_11.1.1\classes\META-INF and place the built jar file on the location <<SOAOracle_HOME>>\user_projects\domains\soa_domain\lib. Then restart the server. Now deploy the built project and test this user defined Custom XPATH function.

Hope this will help.


Sunday, 16 October 2011

How to use While Activity in BPEL process

I am going to illustrate one example of using while activity in BPEL process.
In the example I created one Synchronous BPEL process with name ToTestBPELProcessWhileActivity.


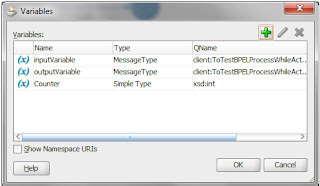
Then Add a new Variable while clicking on highlighted variable icon in below image.

Name the Variable as Counter and select the type as Int by selecting radio button Type in Create Variable Dialogue.


Now Drag one Assign Activity in BPEL process and assign value 3 to Counter variable(Intialize value of the Counter Variable)


Then Drag one While activity below the assign activity and set the condition in General tab of While Activity as if loop should run till Counter variable have value greater then Zero.


Inside the scope of While Activity. Drop one Transformation activity as provided in below image.


Use the any activity to repeat it three times. Then Drop Assign activity below the transform activity in While Activity scope then use copy operation .It will decrement the loop counter variable as below


Once Counter variable value will be less then zero then while loop will terminate. That's it.


Monday, 10 October 2011

Comparison between BPEL 1.1 and 2.0 Specification

Messaging:- In BPEL 1.1 there is no defined behavior for a process that receives a message for a request-response operation and finishes without replying. In BPEL 2.0, such a scenario would have trigged a new BPEL standard fault called "missingReply" fault.
New activity types:- repeatUntil, validate, forEach (parallel and sequential), rethrow, extensionActivity, compensateScope
Renamed activities:- switch/case renamed to if/else, terminate renamed to exit
Termination Handler:- added to scope activities to provide explicit behavior for termination
Variable initialization
portType attribute:- The attribute "portType" of messaging activities such as "receive," "invoke," "reply," "pick," and "onEvent" is no longer mandatory and can be omitted

The XML element "compensationHandler" and the XML attribute "enableInstanceCompensation" in the top-level "process" element have been removed.Instance (process) level compensation handlers never had any mechanism for being invoked; therefore, because they could not be used instance level compensation handling is no longer supported.Replace XML attribute "variableAccessSerializable" with "isolated"

The URI used to specify XPath 1.0 as the expression/query language of choice has been changed, so replace the attribute value "http://www.w3.org/TR/1999/REC-xpath-19991116" of the attributes "expressionLanguage" and "queryLanguage" with the attribute value "urn:oasis:names:tc:wsbpel:2.0:sublang:xpath1.0"
Replace the XML attribute "variableAccessSerializable" with "isolated" .
XSLT for variable transformations (New XPath extension function bpws:doXslTransform).
Locally declared messageExchange (internal correlation of receive and reply activities) .
XPath access to variable data (XPath variable syntax $variable[.part]/location).

Sunday, 25 September 2011

How to publish and subscribe using mediator

This project illustrate the example of publishing and subscribing through mediator. where publish project will invoke the subscribed project and will do the entry in database.
Step1:- Create a new Generic Application with any name
Step 2:- Then create one SOA project with empty Composite for publishing the event.

Step 3:- Drag mediator in component section of composite.xml and select the input customer.xsd
Create one customer.xsd using following entry:-
<schema xmlns="http://www.w3.org/2001/XMLSchema"
        targetNamespace="http://xmlns.oracle.com/ns/Customer"
        xmlns:cust="http://xmlns.oracle.com/ns/Customer"
        attributeFormDefault="qualified" elementFormDefault="qualified">

 <element name="Customer" type="cust:CustomerType"/>
 <complexType name="CustomerType">
    <sequence>
        <element name="customerId" type="string" />
        <element name="Name" type="string" />
        <element name="Age" type="integer" />
<element name="Address" type="string" />
<element name="State" type="string" />
<element name="Country" type="string" />
<element name="City" type="string" />
    </sequence>
</complexType>
</schema>
Step 4:-  Create one event using the same customer.xsd. Click on the create event flash icon

Step 5:- Click on the plus icon to select the customer.xsd


Step 6:- Now right click on the mediator and click the Add Publish Events and then select the .edl file of the created event  in the Event Chooser box.

Step 7:- Open mediator and click on the Transform icon and select the create new mapper radio button. Now  perform one to one mapping as shown below.
Step 8:- Now Create a new SOA project  inside same application with empty composite selected.
Step 9:- Drag n drop the mediator component and select  the subscribed to events template.Then click on the plus icon and select the same .edl  file inside the Event Chooser box.
Here we can notice Run as publisher whether to set it "no" or "yes". If we will set it as yes then all the security policies which are there in the publisher will be applicale to subscriber service as well.

Step 10:- Open mediator and click on the Transform icon and select the create new mapper radio button. Now  perform one to one mapping as shown below.
 
Step 11:- Then drag one BPEL process and choose the template as one way and select the input as customer.xsd.
Step 12:- Then drag one database adapter in Reference section of composite.xml

Step 13:- Enter the JNDI name as same created in my previous blog
Step 14:- select the operation insert as shown below then in next page click on the “Import Table” and then in the Query section dialogue search for the Customer table and Select it.


Step 15:- Then select one primary key as while creating table I didn’t define any primary key so this step will come for the tables where no primary key is defined.
Step 16:- Now drag the wire from mediator to bpel and from BPEL to Database Adapter.
Step 17:- Now open the Mediator Component and drag the transform and then invoke activity.
Step  18:- From invoke activity drag a wire for database adapter to define the partner link. Inside the partner link dialogue Click on the plus icon to create one input variable and select the default value and click ok.

Step 19:- Open the transformation activity and in the source section click the Plus icon and select the input variable and then in the target variable section select the input variable as of invoke activity. Then click on the plus icon in the Mapper File section to create one new xslt file.

Step 20:- Inside xslt file map the sections as below.
Step 21:- After deployment of both the Project. Now select the published one project and click on the test button. Fill all the mandatory field and click on the test web service button below.Now in the response section click on the Launch Flow Trace link and see the flow.
Then After testing the service check whether the data is updated in database table.

Wednesday, 21 September 2011

How to create DB DataSource and JNDI Name

Why to Create DataSource and JNDI Name:- JNDI name is the referenece to the repository or registry where the database connection detail and physical server address is present.

How to Create DataSource and JNDI Name:- To create a data source:
1. Navigate to http://servername:portnumber/console.
2. Use the required credentials to open the Home page.

3. Under Domain Structure, select Services then click Data Sources.
The Summary of JDBC Data Sources page is displayed.


4. Click New and then Generic Data Store. The Create a New JDBC Data Source page is displayed.


5. Enter the following values for the properties to be used to identify your new JDBC
data source: Name: demoDatabase JNDI Name: jdbc/demoDatabase Database Type: Oracle   

            
6. Retain the default value for Database driver in next  page
7. Click Next. The Create a New JDBC Data Source Transaction Options page is
displayed.
8. Click Next. The Create a New JDBC Data Source Connection Properties page is
displayed. Enter the database  connection properties in the Connection Properties page, and then click
Next.
The Create a New JDBC Data Source Test Database Connection page is displayed.


9. Click Test Configuration to test the database availability and the connection
properties you provided. A message stating that the Connection test succeeded is
displayed at the top of the Create a New JDBC Data Source Test Database
Connection page.
10. Click Next. The Create a New JDBC Data Source Select Targets page is displayed.
11. Select a target, and then click Finish. You have created a data source.


The Summary of JDBC Data Sources page is displayed. This page summarizes the
All changes have been activated. No restarted required for the changes to take effect

Creating a Connection Pool:-
1. Under Domain Structure, click Deployments.The Summary of Deployments page is displayed.
2. Click the DbAdapter name from the Deployments list.
The Settings for DbAdapter  page is displayed.
3. Click Configuration tab, and then click Outbound Connection Pools tab.
The Outbound Connection Pool Configuration Table is displayed.


4. Click New.
5. Select javax.resource.cci.ConnectionFactory, and then click Next.
The Create a New Outbound Connection page is displayed.
6. In the JNDI Name: field, enter eis/DB/demoDatabase. Then click Finish.
The JNDI name specified in this step must match the value with database connection that need to create in jDeveloper.
7. Click on the newly created OutboundConnection.In the Properties field, enter the value for xADataSourceName as jdbc/demoDatabase which was created previously. press Enter in the
keyboard to save the changes.
8 Under Domain Structure, click Deployments.The Summary of Deployments is displayed.
9 Do either of the following steps:
a. Select the DbAdapter check box, and then click Update.The Update Application Assistant page is displayed.
b. Select Redeploy this application, and then click Finish.
Adding  a new value for the outbound connection pool, then no re-start required for the Managed server or the Admin server. However, editing is done on any property of an existing connection pool, then re-start of the server  is required